This is an interactive notebook. You can run it locally or use the following links:
This tutorial demonstrates how to build a multi-agent system that uses OpenAI’s structured outputs feature, and how to trace agent interactions with Weave. By the end, you have a four-agent data analysis pipeline whose intermediate inputs and outputs are visible in the Weave UI. OpenAI released Structured Outputs so the model always generates responses that adhere to your supplied JSON Schema without strongly worded prompts. With Structured Outputs, you don’t need to validate or retry incorrectly formatted responses. By using the parameter strict: true, you can guarantee the response abides by a provided schema. Structured outputs in a multi-agent system produce consistent, predictably processed data between agents. They also support explicit refusals and remove the need for retries or response validation.
Source: This cookbook is based on sample code from OpenAI’s structured outputs, with some modifications added for improved visualization using Weave.

Install the dependencies

First, install the libraries the tutorial depends on. This tutorial uses the following libraries:
  • OpenAI to create the multi-agent system.
  • Weave to track the LLM workflow and evaluate prompting strategies.
Next, configure credentials and initialize Weave so traces are logged to your W&B project. Set WANDB_API_KEY in your environment so you can log in with wandb.login(). Provide this to Colab as a secret. Set the W&B project to log into in name_of_wandb_project.
name_of_wandb_project may also be in the format of [YOUR-TEAM]/[YOUR-PROJECT] to specify a team to log the traces into.
Then fetch a Weave client by calling weave.init(). Because this tutorial uses the OpenAI API, you also need an OpenAI API key. Sign up on the OpenAI platform to get your own API key. Provide this to Colab as a secret too.

Set up the agents

With Weave initialized, define the agents that make up the system. The use case for this tutorial is a data analysis task. First, set up the four-agent system:
  • Triaging agent: Decides which agents to call.
  • Data pre-processing agent: Prepares data for analysis, for example by cleaning it up.
  • Data analysis agent: Performs analysis on the data.
  • Data visualization agent: Visualizes the output of the analysis to extract insights.
Start by defining the system prompts for each of these agents. These prompts establish each agent’s role and the tools it’s allowed to call.
Next, define the tools for each agent. Apart from the triaging agent, each agent has tools specific to its role: Data pre-processing agent: Clean data, transform data, and aggregate data. Data analysis agent: Statistical analysis, correlation analysis, and regression analysis. Data visualization agent: Create bar chart, create line chart, and create pie chart.

Enable multi-agent tracking with Weave

With the agents and their tools defined, the next step is to wire them together and enable Weave tracing. Write the code logic to:
  • Handle passing the user query to the multi-agent system.
  • Handle the internal workings of the multi-agent system.
  • Execute the tool calls.
From the user query, you can infer that the tools to call are clean_data, start_analysis, and use_line_chart. Begin by defining the execution function responsible for running tool calls. By decorating Python functions with @weave.op(), you can log and debug language model inputs, outputs, and traces. A multi-agent system involves many functions, but it’s sufficient to add @weave.op() on top of each one.
Next, create the tool handlers for each of the sub-agents. These have a unique prompt and tool set passed to the model. The output is then passed to an execution function that runs the tool calls.
Finally, create the overarching tool to handle processing the user query. This function takes the user query, gets a response from the model, and passes it to the other agents to execute.

Execute the multi-agent system and visualize in Weave

With every agent, tool, and handler in place, the system is ready to run. Finally, execute the primary handle_user_message function using the user’s input and observe the results.
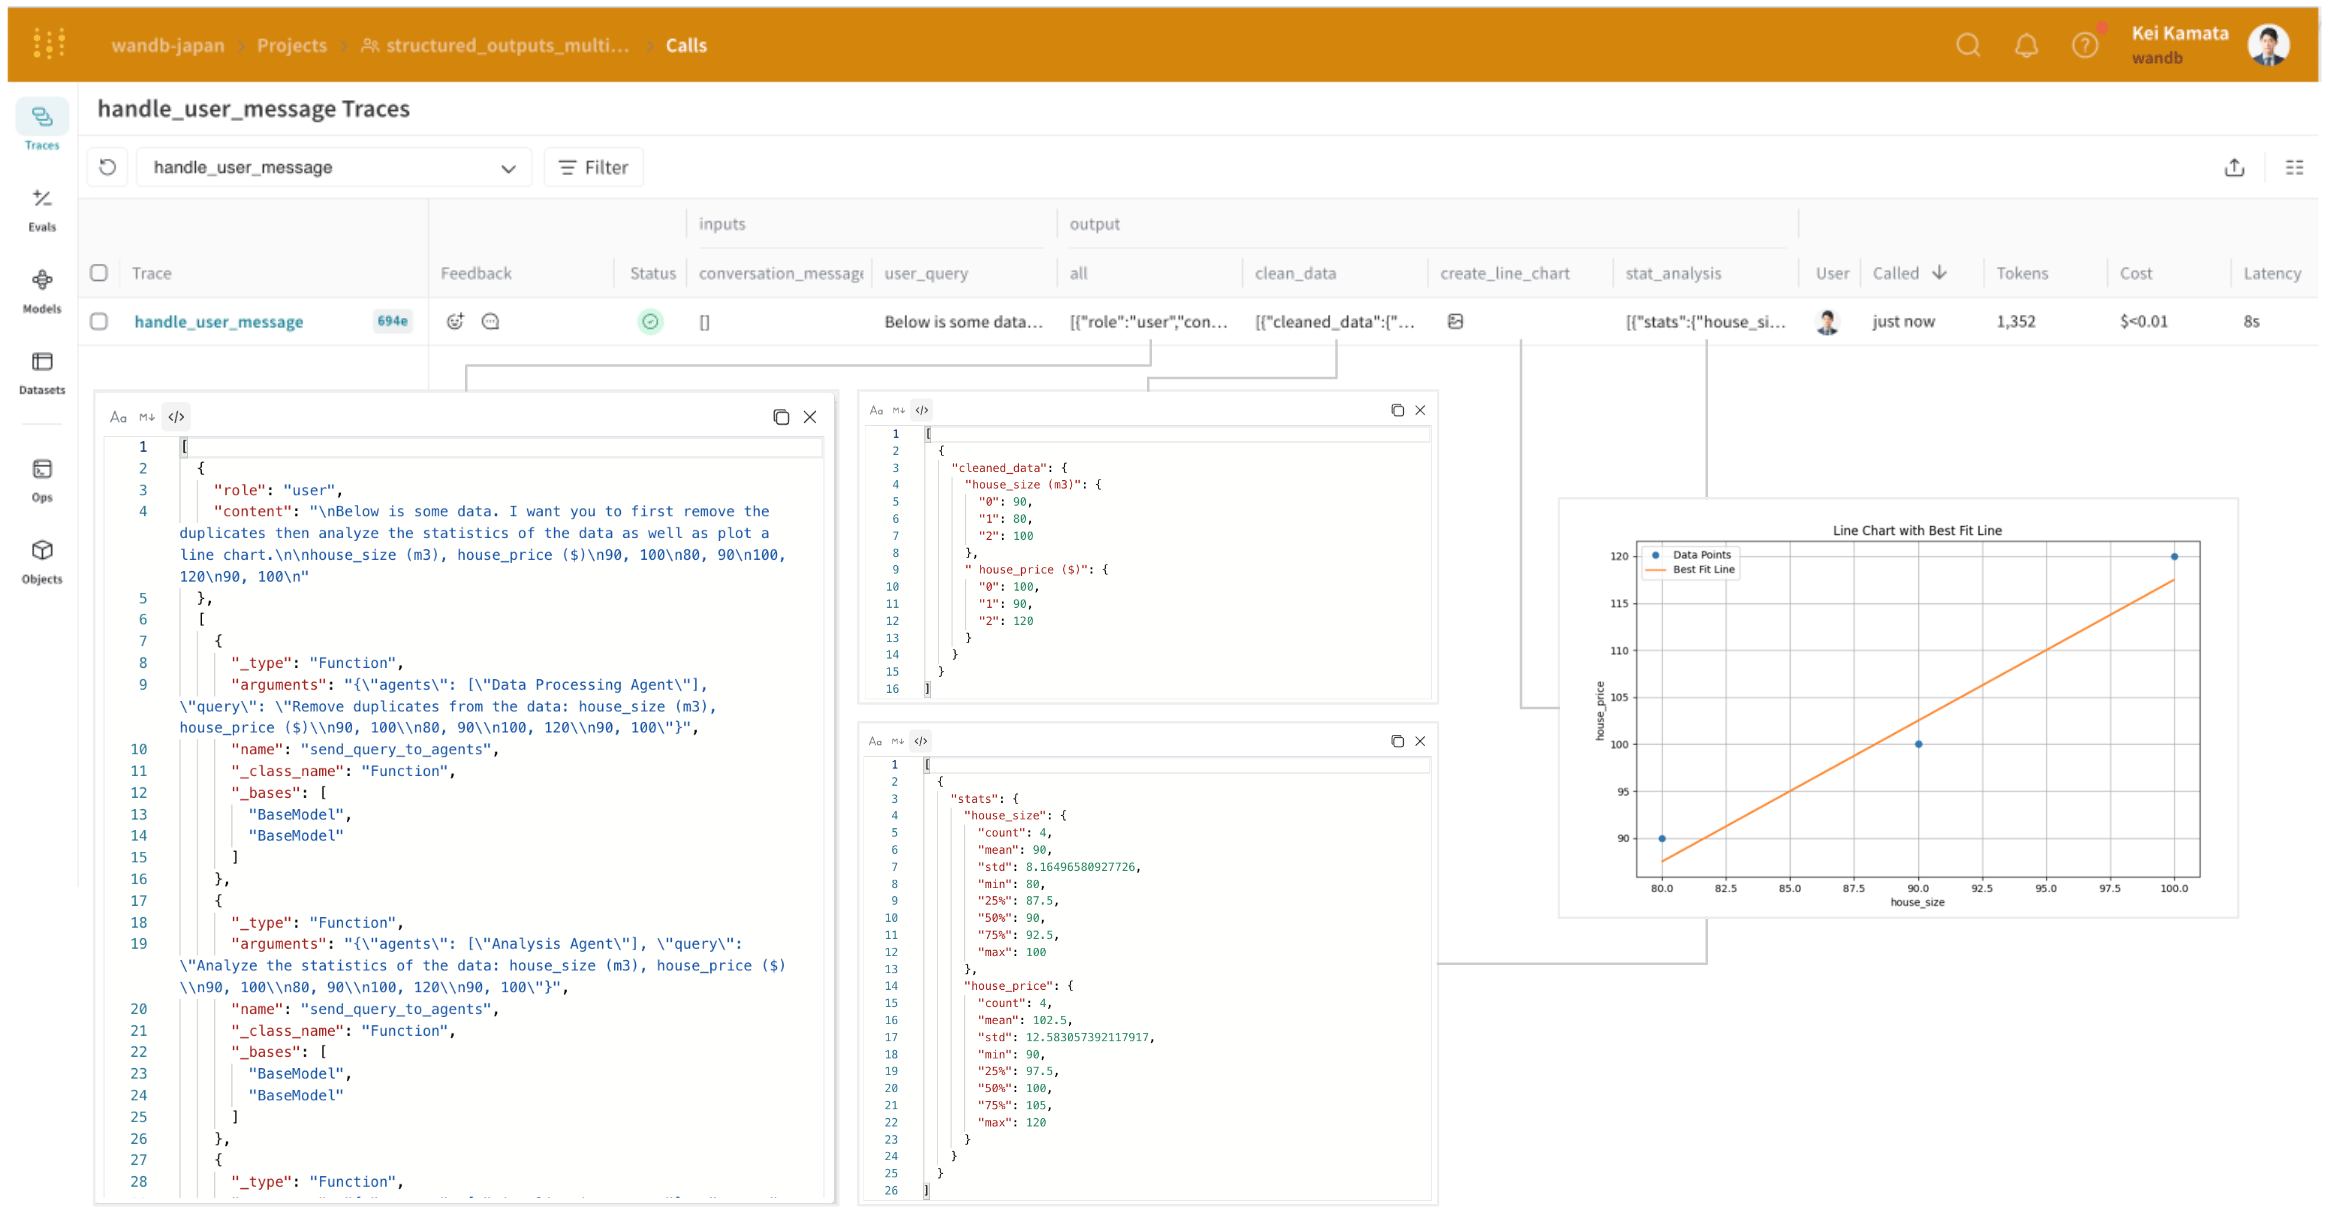
When you click the Weave URL, you can see the execution trace. On the Traces page, you can check the input and output. For clarity, the diagram includes screenshots of the results displayed when you click each output. Weave integrates with the OpenAI API and automatically calculates costs. Cost and latency are also displayed alongside each trace. Weave Traces page showing the multi-agent execution with cost and latency Click a line to see the intermediate processes that ran within the multi-agent system. For example, the input and output of the analysis_agent appear in a structured output format. OpenAI’s structured outputs help agents collaborate, but as the system grows more complex, the format of these interactions becomes harder to follow. Weave lets you inspect these intermediate processes and their inputs and outputs in detail.
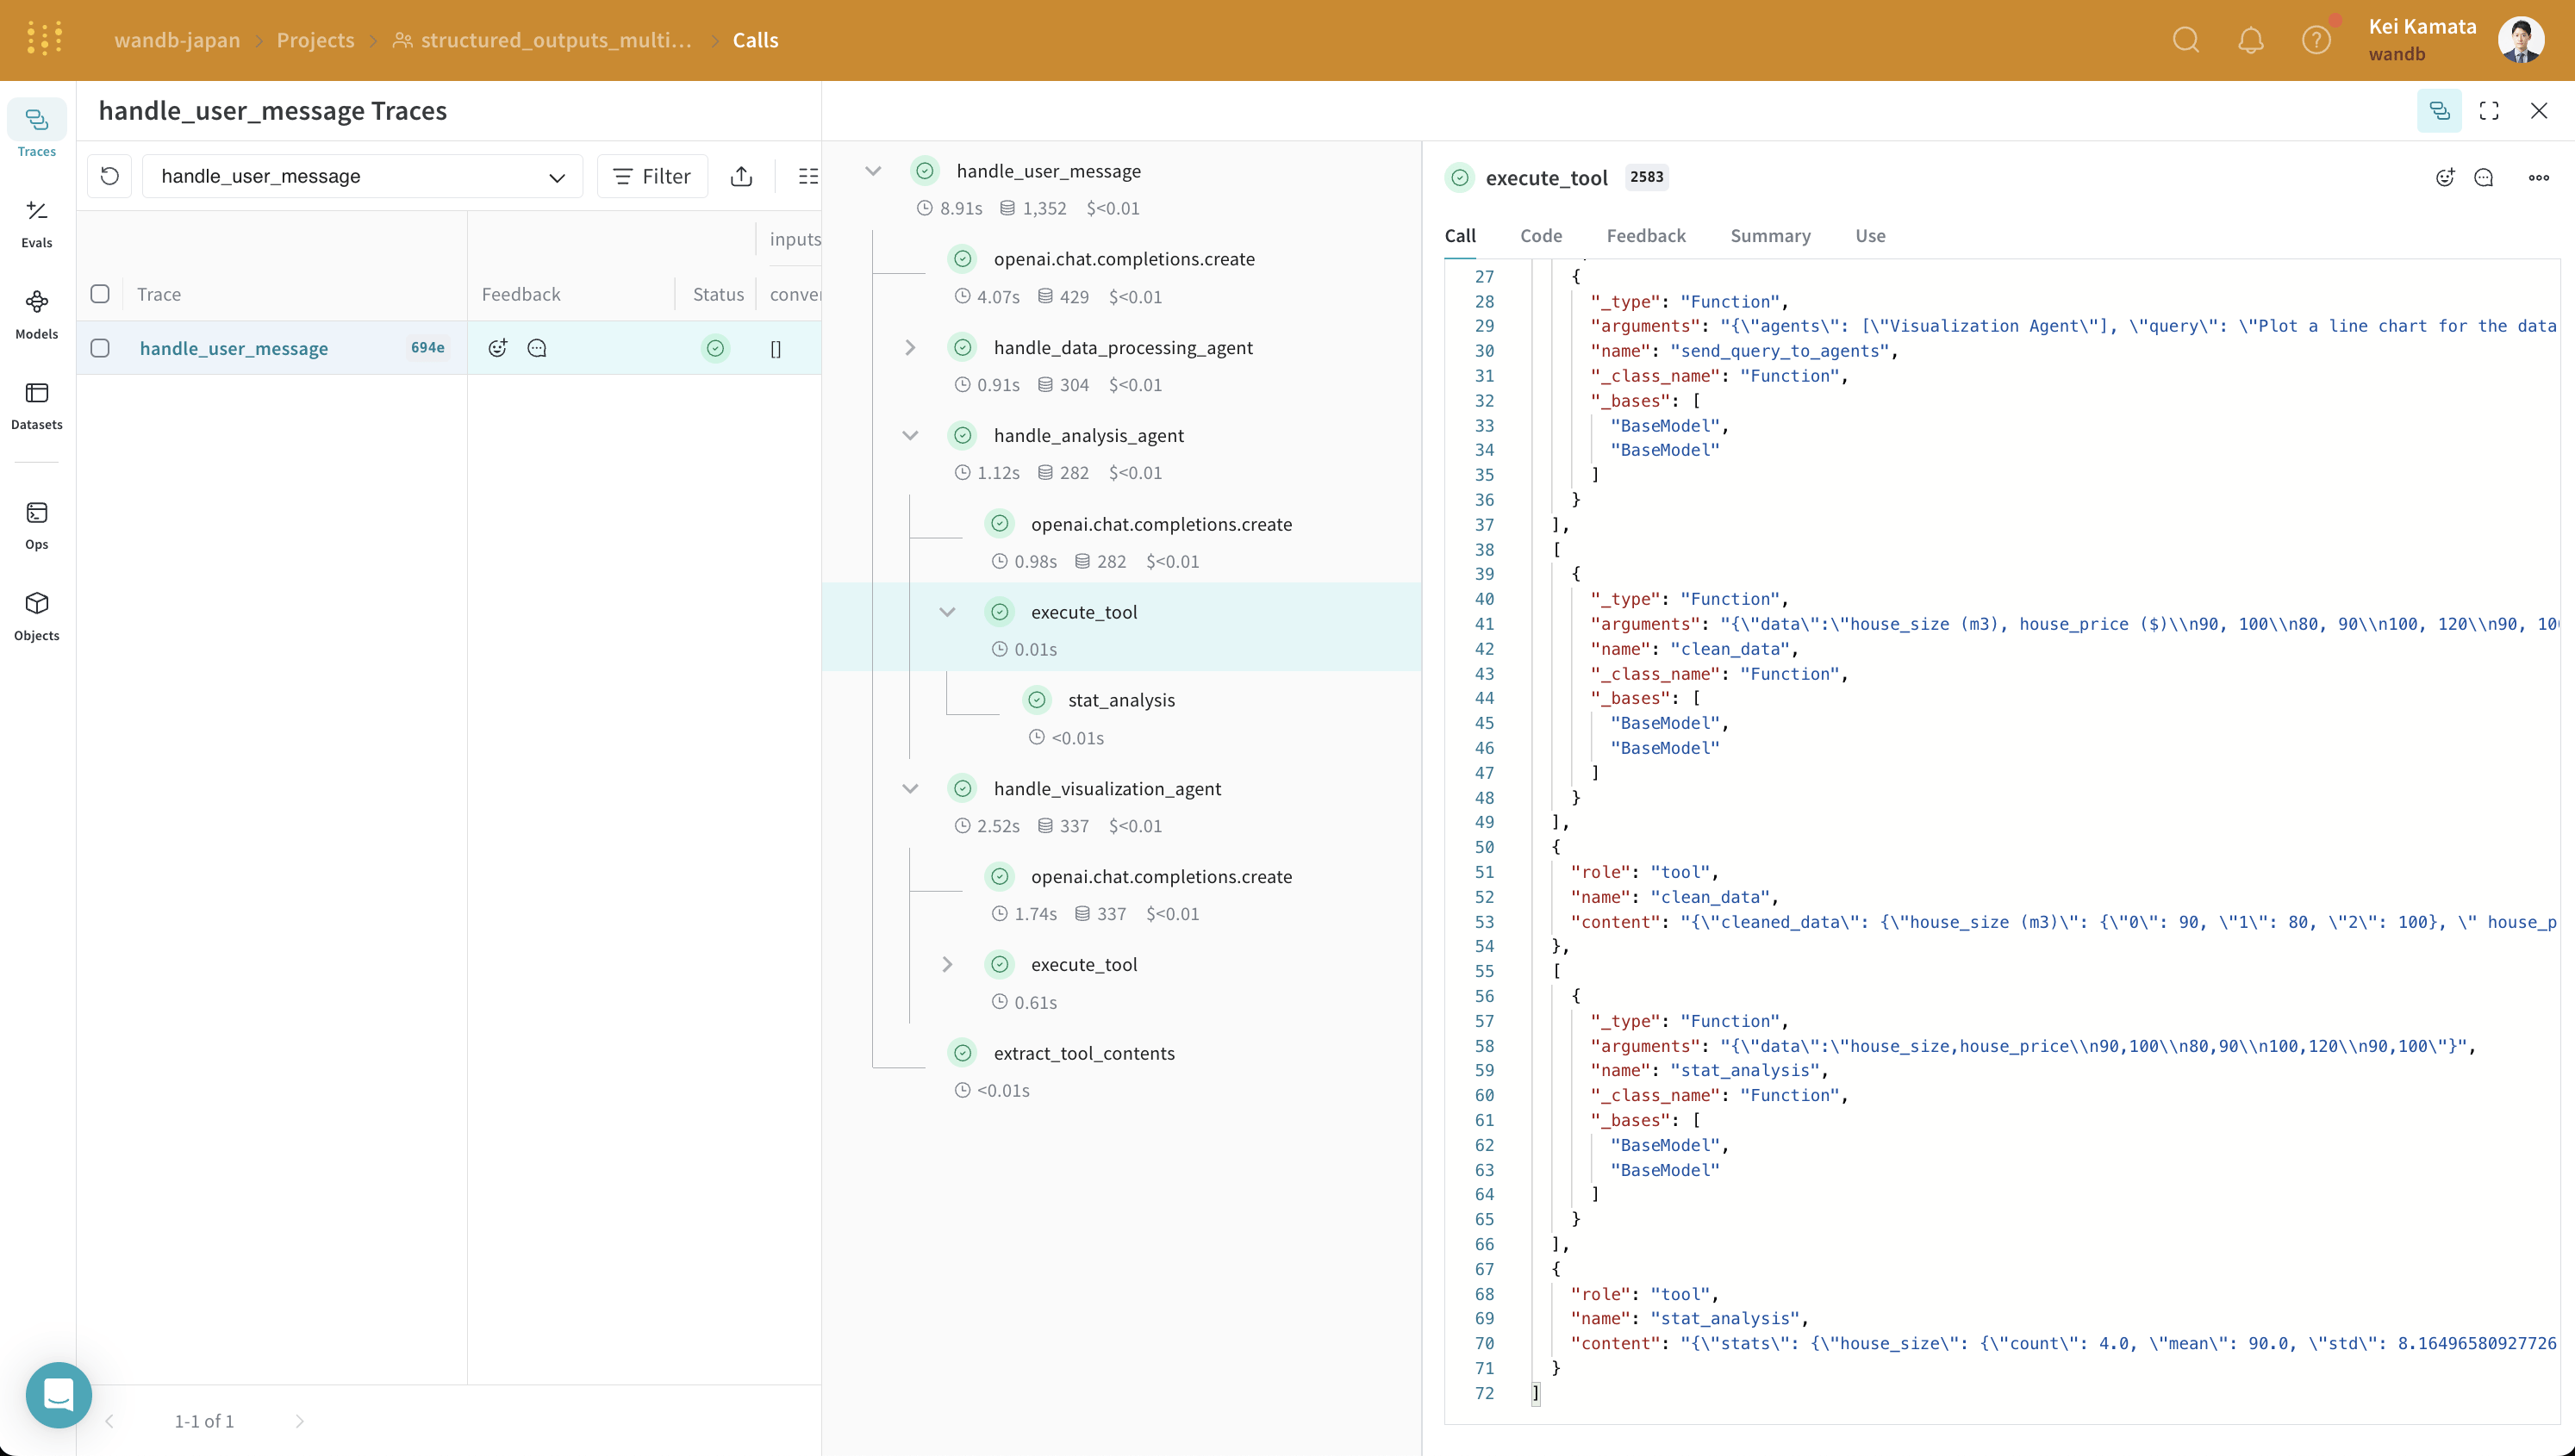
Weave trace detail showing the analysis agent's structured input and output
Take a closer look at how tracing is handled in Weave.

Conclusion

In this tutorial, you learned how to develop a multi-agent system using OpenAI’s structured output and Weave for tracking inputs, final outputs, and intermediate output formats. You now have a working example you can extend with additional agents, tools, or structured response schemas.